


In this episode of The Gentleman
Maker, we will create every British person’s dream: an IoT teapot. No
longer will you have to get off the couch to get the pot brewed! Use
your smartphone to put the kettle on!
IoT Teapot BOM
- ESP8266 Wi-Fi D1 R2 dev board
- 2 x 12V 100W travel cup boilers (R3, R6)
- A ceramic teapot
- 1 x ATX power supply
- 2 x 10A @ 30V relays (RL1, RL2)
- Thermistor (TH1)
- 100R resistor (R2)
- 1K resistors (R1, R5)
- 5.6K resistor (R4)
- 2N3904 transistors (Q1, Q2)
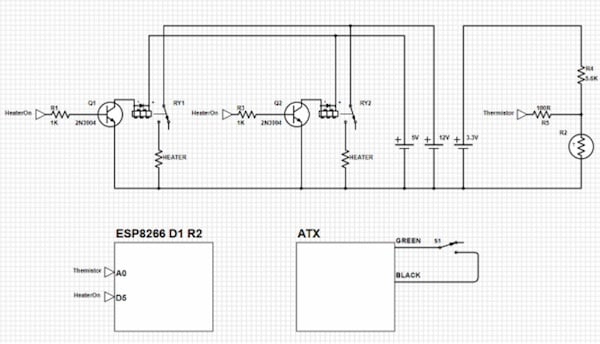
The Schematic
When the ESP8266 detects a request for tea, it starts by switching on its output D5 (which has been labeled as HeaterOn). When this happens, Q1 and Q2 are switched on, which energizes relay coils RY1 and RY2. This energizing of the coil creates a magnetic field, which attracts a small mechanical lever inside the relays. This completes the heater circuits and turns on the heater elements (HEATER). Then the water begins to boil.The thermistor R2 is a potential divider circuit, with R4 such that the voltage across the thermistor is inversely proportional to its temperature. In other words, as the water temperature increases, so does the outside of the pot, and, therefore, the voltage across R2 (the thermistor) decreases. This voltage is measured by the ESP8266 (via pin A0), which is used for analog measurement readings, and a series protection resistor (R5) sits between the divider and the analog input pin. Eventually, the thermistor voltage will cross a threshold, which will result in the ESP8266 turning off both transistors, Q1 and Q2. This will de-energize the two relays and, thus, disable the heaters.
You can check out the full schematic here!
Creating the Teapot
When putting the heating elements inside the teapot, it’s best to go through the lid instead of trying to drill a hole in the bottom. Originally, I was going to use a small hole on the bottom, feed the wires through, and then seal it with two-part epoxy, but there are two potential issues with this:- The two-part epoxy may not be food-safe.
- Heat expansion may cause a leak.
So, instead, I attached the thermistor to the underside of the pot and secured it in place with some masking tape; however, this could, in fact, be glued on. Then, to determine the cut-off temperature, you can simply fill the pot with boiling water and wait for the pot to heat up. At this point, you can either obtain an ADC reading on the MicroPython or measure the voltage across the thermistor.
The Website
Most free hosting sites allow PHP files, so this project should work on an unpaid site. However, I paid for web service through AwardSpace, bought my own domain, and created a subdomain just for this project (iot.websitename.co.uk). While the website shown in this project has many files, they are mainly for CSS styling and layout. The only files that really matter are index.php (the main entry point), indexContent.php (which holds our buttons), submit.php (which we send commands to), and tea.html (which holds the teapot state).Pressing the “Tea On” button will invoke the submit.php page and create an external file called “tea.html” with the word “#Tea On#”. The text is surrounded by hashtags, so we can pass the entire HTTP message (which also includes header information) into a string split, where the splitting element is “#”. In the end, the first split is the header and some other information, the second element is the tea state, and the third element is the rest of the HTML file.
The Python Code
The code for the teapot is incredibly simple. It consists of three main functions:- Wi-Fi connection
- HTTP GET message
- HTTP POST message
Once the tea.html file has changed to “Tea On”, the code enters a loop where the elements are switched on and constant analog readings from the thermistor are taken. Once the water reaches the designated temperature, the code turns off the elements and sends an HTTP POST message, informing the website to set the tea state to “Tea Done”. You can see the activity on the MicroPython as it runs if you plug it into a computer and open a terminal window!
Now you're ready to put together your kettle and make a cup of tea! Let us know about your tea-related electronics adventures in the comments below.


No comments:
Post a Comment