


The intuitive, step-by-step
procedure presented in this article will help you to successfully
perform reflow soldering in your toaster oven.
This article presents
a detailed, adaptable procedure whereby any ordinary toaster oven can
be forced to reproduce, with reasonable accuracy, a reflow-soldering
temperature profile. The first thing you will need is the thermocouple
measurement system developed in a previous article (Make an EFM8-Based System for Monitoring and Analyzing Thermocouple Measurements);
if you already have some sort of hardware/software combination for
collecting, recording, and visualizing thermocouple measurements, feel
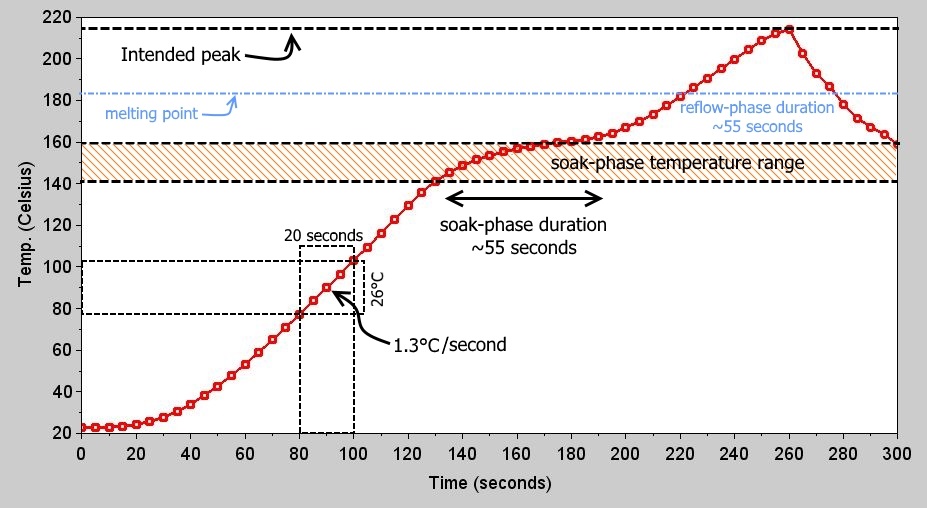
free to give it a try. You should also read Introduction to Manually Controlled Toaster Oven Reflow,
which describes the benefits of DIY reflow, suggests some features to
look for in a toaster oven, discusses the data-collection hardware
setup, provides background information on reflow temperature profiles,
and presents the specific profile that we will be using. You will
probably want to refer back to this profile as you read through this
article, so I’ll include it here for your convenience.

Before we get started, note the following in regard to the data-collection process:
And one last note: This probably goes without
saying, but solder paste contains chemicals that you don’t want anywhere
near your food. Make sure everybody in your office or home knows that
your “reflow” oven is for soldering, not cooking.
Let’s
start with the hands-off approach and see if the toaster oven can fend
for itself. We will aim for 215°C, because this is the middle of the
peak temperature range. The profile indicates that the ideal duration is
300 seconds to peak. Thus, for this first run we set the function to
“bake,” the temperature to 215°C (aka 419°F), and the timer to 5
minutes. Here are the results:

Hmm. . . . Black & Decker will have to refine their temperature control algorithm if they plan to market this thing as a reflow oven. Let’s see—we overshot the intended peak temperature by 60°C (and therefore exceeded the maximum temperature by 50°), we remained in the reflow zone for way too long, and the overall shape of the temperature curve is thoroughly inconsistent with the profile. The oven did indeed turn off at about 300 seconds, so at least the timer is accurate, but this is not apparent in the data because the temperature decreases very slowly without any active heat removal. Conclusion: FAILURE.
First
let’s address this peak temperature problem. We need to find the
temperature setting that actually corresponds to 215°C. My first
guestimate is 390°F (199°C) on the dial. Everything else for this run is
the same as in the previous run. Here are the results:

This time we exceeded the intended peak temperature by only 35°C (last time was 60°C), so we’re getting closer. Let’s try 350°F (177°C) on the dial, with everything else the same.

This looks pretty good. The measured peak temperature was 210°C. So now we know an approximate temperature setting that will help the actual temperature to converge toward our desired peak of 215°C. Also, we can see from the first three runs that the oven naturally produces a rate of temperature increase (in this case about 1.4°C/second) that is far below the maximum, so we don’t need to worry about that part of the profile. The only problem with this run is indicated by the flat portion of the temperature curve—this temperature setting for some reason led the control system into a different operational region, such that the heating elements turned off for a while then turned on again to reach the final temperature. We want a setting that will take the temperature directly to the peak with no delays—it’s fine if the final temperature is a little too high because we can easily fine-tune the peak by simply shutting off the oven. It turns out that an appropriate setting is 375°F (191°C):

As you can see, this setting takes the oven directly and smoothly to an excellent peak temperature; we can shut off the oven before the heating elements kick in and cause the final increase to 230°C.
Now
we need to make the measured profile look more like the recommended
profile. This means manually turning the oven on and off to 1) create a
better soak phase, 2) enforce an appropriate amount of time in the
reflow phase, and 3) fine-tune the peak temperature. Here is the
specific procedure used to generate the next temperature curve:

We can immediately see that our temperature curve looks much more like the profile. This is good. But we still have three problems, as indicated in the image:
The first two shortcomings originate from the same mistake; namely,
not accounting for lag in the temperature response. The heating elements
remain hot after they are deactivated, and we need to compensate for
this by making adjustments earlier. The third problem occurs because the
temperature decreases too slowly—we are not actively removing heat from
the oven, so everything stays hot. Fortunately, there is a very simple
solution: open the oven door. Here is the procedure used to generate the
final temperature curve:

Success! Look through the annotations for this curve, and you will see that all our critical reflow specifications have been met. The only (minor) violation is the length of the reflow phase, which should be at least 60 seconds. You could easily remedy this by waiting a few more seconds before opening the door. You could also perform the first heating-element deactivation a little sooner in order to move the soak-phase portion of the curve closer to the center of the specified soak-phase temperature range. Bottom line, this profile should be more than adequate for DIY, prototype-quality reflow.
Required Hardware/Software
- Simplicity Studio integrated development environment
- PmodTC1 thermocouple module (K-type thermocouple included)
- Toaster oven (this one works)
The System and the Profile
Before we get started, note the following in regard to the data-collection process:
- All the temperature records in this article were generated using 5-second intervals between measurements
- Allow the thermocouple to return to room temperature before you start a new data-collection run.
- Click “Begin Temperature Data Collection” right before you activate the oven.
- Make sure that the thermocouple junction remains close to the surface of the PCB; it might get tweaked out of place when you close the door. If you cannot conveniently run the thermocouple through the gap between the door and the metal frame, you could insert the thermocouple through a small hole drilled in the back of the oven.
- My oven’s temperature dial is labeled only with Fahrenheit, so you will notice some irksome switching-back-and-forth between Celsius and Fahrenheit throughout the rest of this article. Obviously, you can avoid this annoyance by using an oven with Celsius labels.
Step 1: Fire and Forget
Hmm. . . . Black & Decker will have to refine their temperature control algorithm if they plan to market this thing as a reflow oven. Let’s see—we overshot the intended peak temperature by 60°C (and therefore exceeded the maximum temperature by 50°), we remained in the reflow zone for way too long, and the overall shape of the temperature curve is thoroughly inconsistent with the profile. The oven did indeed turn off at about 300 seconds, so at least the timer is accurate, but this is not apparent in the data because the temperature decreases very slowly without any active heat removal. Conclusion: FAILURE.
Step 2: The Search for Peak Temp
This time we exceeded the intended peak temperature by only 35°C (last time was 60°C), so we’re getting closer. Let’s try 350°F (177°C) on the dial, with everything else the same.
This looks pretty good. The measured peak temperature was 210°C. So now we know an approximate temperature setting that will help the actual temperature to converge toward our desired peak of 215°C. Also, we can see from the first three runs that the oven naturally produces a rate of temperature increase (in this case about 1.4°C/second) that is far below the maximum, so we don’t need to worry about that part of the profile. The only problem with this run is indicated by the flat portion of the temperature curve—this temperature setting for some reason led the control system into a different operational region, such that the heating elements turned off for a while then turned on again to reach the final temperature. We want a setting that will take the temperature directly to the peak with no delays—it’s fine if the final temperature is a little too high because we can easily fine-tune the peak by simply shutting off the oven. It turns out that an appropriate setting is 375°F (191°C):
As you can see, this setting takes the oven directly and smoothly to an excellent peak temperature; we can shut off the oven before the heating elements kick in and cause the final increase to 230°C.
Step 3: Refining the Profile
- Set the temperature to 375°F and turn on the oven by moving the timer to about 10 minutes—that is, long enough to ensure that the oven does not shut off before we manually shut it off.
- Keep your eye on the numeric temperature display. When the temp reaches 140°C (i.e., the lower bound of the soak-phase temperature range), do whatever it takes to deactivate the heating elements. I accomplish this by quickly turning the temperature dial to its minimum setting.
- Wait until the temperature reaches the upper bound of the soak range (160°C), then reactivate the heating elements. The temperature setting should be the same as when you started, in this case 375°F.
- Deactivate the heating elements when the temperature reaches the desired peak (i.e., 215°C).
We can immediately see that our temperature curve looks much more like the profile. This is good. But we still have three problems, as indicated in the image:
- We significantly overshot the intended peak temperature.
- The temperature leveled out above the soak range.
- The length of time above the melting point is still way too long.
- Set the temperature to 375°F and turn on the oven.
- When the temp reaches 130°C, deactivate the heating elements.
- Wait until the temperature reaches the upper bound of the soak range (160°C), then reactivate the heating elements. The temperature setting should be the same as when you started, in this case 375°F.
- Deactivate the heating elements when the temperature reaches 205°C.
- When the temperature reaches 215°C, open the door.
Success! Look through the annotations for this curve, and you will see that all our critical reflow specifications have been met. The only (minor) violation is the length of the reflow phase, which should be at least 60 seconds. You could easily remedy this by waiting a few more seconds before opening the door. You could also perform the first heating-element deactivation a little sooner in order to move the soak-phase portion of the curve closer to the center of the specified soak-phase temperature range. Bottom line, this profile should be more than adequate for DIY, prototype-quality reflow.


No comments:
Post a Comment